Full Parallax experience for your 2D game!
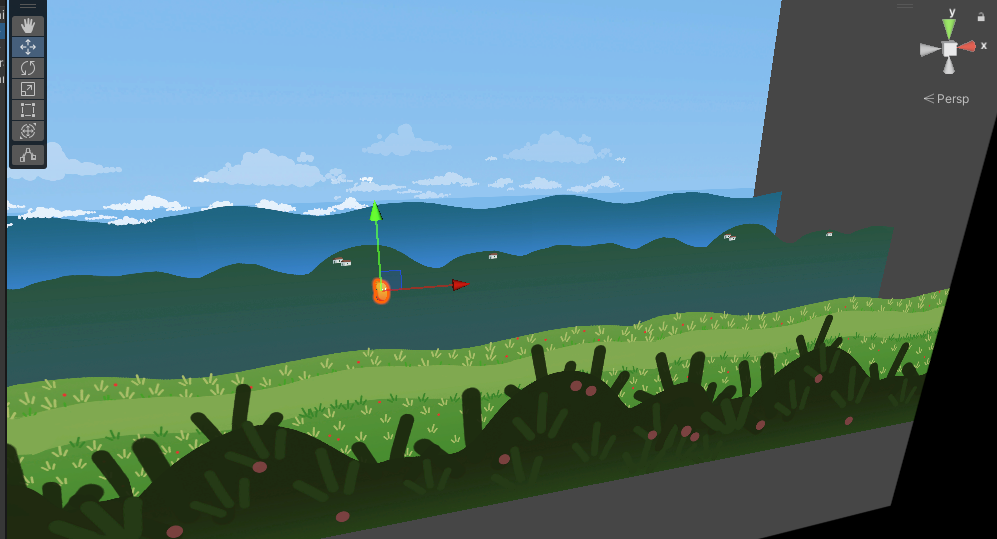
Parallax is when you can sense depth by the way the objects move. This script was made to help developers achieving that effect effortlessly and save hundreds of hours of work.
Enhance your game project with a touch of depth, adding immersion without sacrificing the classic charm of 2D games. Whether you’re developing 2D Platformers, Metroidvanias, Endless Runners, Fighting Games, Retro Racing, or other Side-scrollers, a parallax effect can elevate the experience for your players.
—> Download here (Unity Asset Store link)
Version History
- Version 1.0 – May 2024
Components
- Scripts
- VisuParallax.cs (Parallax Manager script)
- VisuCameraFollow.cs (Camera Follow script)
- PlayerScript.cs (Simple player movement script for the demo)
- Custom Editor Scripts
- CustomVisuEditor.cs (Custom editor to enhance your interaction with the Parallax Manager)
- VisuCameraEditor.cs (Custom editor for the Camera Follow script)
- Prefabs
- Scenario Prefab (Collection of backgrounds and foregrounds for the demo)
- Player Prefab (Simple player little fella for the demo)
- Scenes
- Visu Parallax Demo Scene
Installation
To install Visu – 2D Parallax Solution into your Unity project, follow these simple steps:
- Download:
- Import:
- Open your Unity project.
- Navigate to Assets > Import Package > Custom Package.
- Select the downloaded Visu – 2D Parallax Solution package and click Open.
- Configuration:
- Attach VisuCameraFollow.cs to your camera and assign Player and Camera in the inspector. (Note: The parallax should work with other Camera Follow scripts of your choice.)
- Attach the VisuParallax.cs component to an empty GameObject. This will be our Parallax Manager.
- Make sure the VisuCustomEditor.cs is in your project’s Editor folder. (Important)
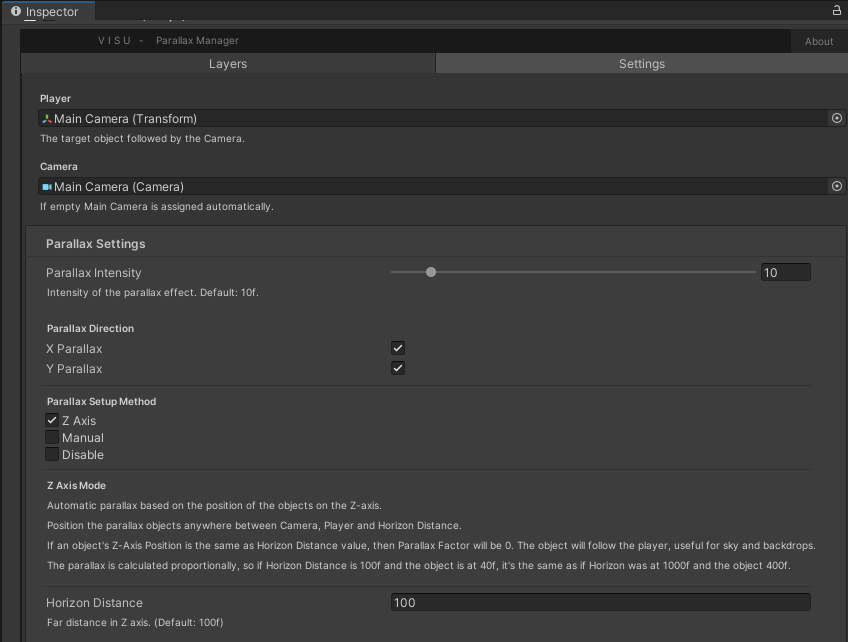
- In the Parallax Manager Settings tab in the inspector, assign the Player and Camera
- Select the Parallax Mode:
- Z-Axis:
- Automatic parallax based on the position of the objects on the Z-axis.
- Position the parallax objects anywhere between Camera, Player and Horizon Distance. This calculates how much the layer should move.
- If an object’s Z-Axis Position is the same as Horizon Distance value, then Parallax Factor will be 0. The object will follow the player, useful for sky and backdrops.
- Note: The parallax is calculated proportionally, so if Horizon Distance is 100f and the object is at 40f, it’s the same as if Horizon was at 1000f and the object 400f.
- Manual
- Assign the Parallax Factor (Range: -1, 1) for each layer manually in the inspector (Layers tab). Background layers in positive numbers, foreground layers in negative numbers.
- In this mode, the Z-axis position is ignored.
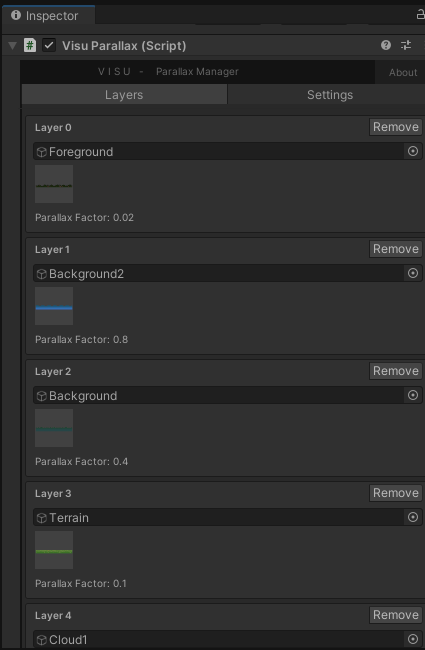
- In the Parallax Manager Layers tab, assign the objects that will perform the parallax effect
- Tip: if multiple objects are at the same depth, you can group them inside an empty game object and assign that game object as a layer. This is particularly useful to avoid the end of the background layer to be seen when the player goes to far. All you have to do is duplicate the object two times, position them next to the original object and group them under one object to be assigned as a Parallax Layer. (Seamless textures work best).
- Z-Axis:
- More Settings (Optional):
- If needed, play around with Horizon Line and Parallax Intensity values
- Enable/Disable X or Y axis parallax effect
- Test different positions for your backgrounds until it works for your project.
- All done!
- Enjoy beautiful parallax effect in your project. You just saved several hours if not days of work.
Usage Examples
Visu – 2D Parallax Solution can be used in various 2D game scenarios, including:
- Platformer Games
- 2D Racing Games
- Side-scrollers
Did you use Visu in your project? Contact me to be featured here.
What’s next?
These are some ideas for future features and functionalities for our Parallax Solutions.
- Offset Texture Parallax: when the object stays in place and the parallax offsets the sprite texture instead.
- Looping Backgrounds: A new Visu asset in the making, perfect for creating Endless Runners.
Do you have any other suggestions? Let me know and stay tuned for updates!
Troubleshooting
Encountering issues with Visu? Here are some common problems and their solutions:
Camera Follow:
- Camera Not Following the Target:
- Ensure that the Target GameObject is assigned correctly to the VisuCameraFollow component.
- Verify that the Camera is correctly assigned to the VisuCameraFollow component.
- Jittery or Erratic Camera Movement:
- Adjust the damping settings in the VisuCameraFollow component to smoothen the camera movement.
- Ensure that there are no sudden changes in the target’s position that could cause jittery movement.
- Maybe the issue is with your player. If its movement uses Rigidbody, make sure the Rigidbody interpolation is set to Interpolate.
Player:
- Player falling through terrain
- Make sure the player has a Collider2D component. Make sure the terrain has a Collider2D component as well.
- Player not jumping
- In the PlayerScript settings, assign a Ground Layer for the player to detect. Go to the ground/terrain object inspector and make sure it is assigned the same Ground Layer
- Verify the jump force value in the Player inspector.
- Note: the player is not a parallax layer, no need to assign it in the Parallax Manager.
Parallax:
- Parallax not working
- Check the Parallax Manager inspector, if the settings are correct and if the Parallax Layers are assigned.
- Your camera should be in Ortographic mode, not Perspective mode (which would make the parallax pointless)
- Layer not moving
- Make sure it is assigned as a Layer in the Parallax Manager inspector (Layers tab)
- If Z-axis mode is selected, position the layer’s transform z-axis between camera/player/horizon line position.
- If Manual mode is selected, go to the Layers tab and change the parallax factor.
- Go to the object’s Sprite Editor configuration and check if everything is ok with the sprite sizes and compression. The Full Rect option is recommended for correct parallax.
- Backdrop issues
- If you have a static sky or other backdrop object, you may want to assign it as a parallax layer as well, positioning it in the z-axis equal to the horizon line (z-axis mode) or assigning the Parallax Factor 1f in the Layers tab (manual mode). This will make it follow the player position.
- Terrain issues
- The terrain, collectibles, enemies and any other item that is on the same depth as the player does NOT need to be set as Parallax Layer. If done so, its parallax factor would be 0 (no effect).
- Why is Parallax Factor 0 for all layers?
- In Z-axis mode the Parallax Factor is assigned automatically. Hit play and you’ll be able to see the real Parallax Factor for the layers.
- There are too many layers
- If you are getting confused with the layers, try grouping objects under the same empty game object and assigning that into the Parallax Layers tab.
- Note: Using too many layers may reduce performance.
Other:
- Changing settings
- If you change any setting while on Play Mode, weird behavior is expected. Make sure the game is paused to save the new settings.
- Weird sprite sizes/compression/aliasing
- Probably a problem with your sprite configuration. Make sure it is set to Full Rect and check sprite sizes and compression.
- Check your object’s transform scale and rotation.
- Issues with animation or conflict with other scripts
- The Visu – Parallax Solution should work along with other assets and scripts. However, since it moves the scene objects, if you’re working with complex backgrounds and scripts, there may be some issues, let me know if you encounter any. The enemies, collectables and other interactive elements should be placed on the same plane as the player, with no parallax effect.
If you’re experiencing any other issues or need further assistance, please don’t hesitate to contact me through email or by leaving a comment here in this page.

Thank you!
Leave a Reply